
Blogging on GitHub Pages with minimal effort

I recently chose to start my own dev blog with one key requirement: posting should require minimal effort. I spent a significant amount of time researching and testing before I was finally satisfied with the result. In this post, I’ll save you that effort and demonstrate the fastest way to create a blog similar to mine.
Are you ready to publish your first post in no time? Let’s get started!
Initiating the blog from a template repository
First, let’s set up a GitHub repository for your blog with the template I created from my own blog. That template depends on Jekyll, AsciiDoc, the Minimal Mistakes theme and GitHub Actions. Don’t worry about the technical details yet, we’ll cover that later in this post.
For now, simply follow the steps below to use the template:

You will be asked for a repository name. Please make sure the value you provide matches the following pattern:
your_github_username.github.io (1)| 1 | Replace your_github_username with your actual GitHub username.
For example, my blog repository is named gwenneg.github.io because my GitHub username is gwenneg. |
|
GitHub Pages only work with public repositories, so please don’t make your repo private or your blog won’t be published! |
After your repo is created, GitHub will immediately try and fail to deploy your blog from a GitHub Action:

Don’t worry about that failure. We’ll set up the actual deployment of your blog later.
We’re done initiating your blog and it already has its own repo! Be sure to clone the repo before proceeding to the next section.
Setting the minimal configuration before the first deployment
Before your blog can be deployed, you’ll need to make a few adjustments to the _config.yml file in your repo.
Pay special attention to any lines marked with # FIXME […] as these require immediate action.
Most comments should be self-explanatory, and the file also includes many links to relevant sections of the Minimal Mistakes documentation.
These links should help address any questions you might have.
Deploying the blog
|
Once you’ve completed this section, your posts will be visible to anyone who visits your blog.
Be sure you’re ready for that!
If you prefer to keep a post unpublished, you can do so by adding |
Until now, the deployment of your blog was intentionally disabled in the jekyll GitHub workflow provided by the template repo.
It’s time to enable it by deleting this line in your repo.
Once removed, GitHub will immediately start deploying your blog.
You should soon see a successful GitHub Action run similar to this one:
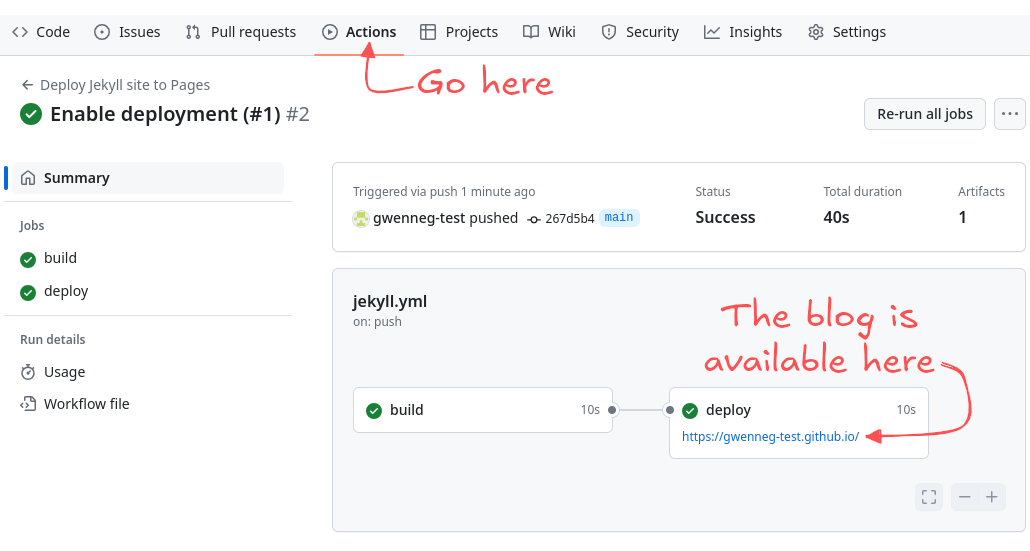
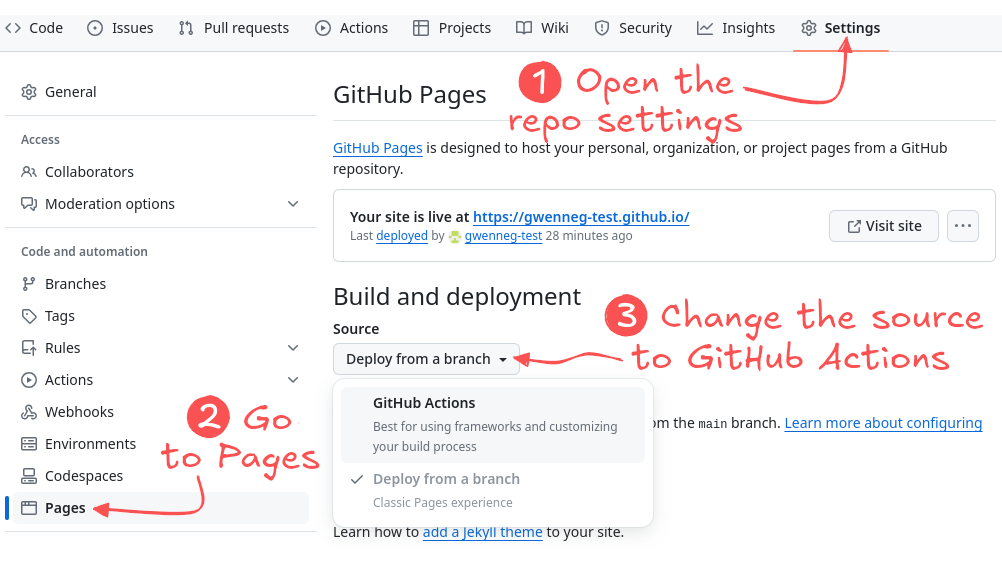
Although GitHub just deployed your blog using a GitHub Action, it will still try (and fail) to deploy it "from a branch" as well. We need to let it know that the blog will exclusively be deployed through the GitHub Action. Here’s how you can do that:
That’s it for the minimal deployment config of your blog!
From now on, as long as you don’t modify the jekyll workflow in your repo, GitHub will automatically redeploy the blog whenever you push changes to the main branch.
If you want to better understand or customize the deployment configuration, the GitHub doc should have all the information you need.
Finally, here is the source of the jekyll workflow provided by the template repo.
|
All sections beyond this point are optional reading. You don’t have to go through them before publishing your first post. However, it’s still recommended, as they provide valuable insights into how the blog functions and how you can customize it. |
A quick look under the hood
Introducing Jekyll
As I wrote in a previous section, the blog depends on Jekyll.
Jekyll is a widely-used static site generator with built-in support for GitHub Pages. It’s not the only option for publishing a blog on GitHub Pages. There are several other alternatives available. Since I haven’t tested those alternatives, I can’t offer recommendations or comparisons. In this post, I’ll focus solely on Jekyll.
When I first started learning about Jekyll, something made me a bit uneasy: it requires a Ruby runtime and Ruby commands to build and test the blog locally. Having never used Ruby before, I was initially hesitant. Now that I’m more experienced with Jekyll, I can assure you that it’s pretty easy to use with zero knowledge of Ruby. Besides the initial local environment setup which is well-documented, you will primarily rely on a single shell command to test your blog:
bundle exec jekyll serve (1)| 1 | This command builds the blog and makes it available for testing at http://localhost:4000. |
|
Many resources, including the GitHub documentation, recommend using the github-pages gem to build a Jekyll-based blog hosted on GitHub Pages.
Not only is that not required, but it might even be a bad idea in the long run.
Indeed, the pages-gem repo isn’t as actively maintained as it used to be.
The |
Introducing AsciiDoc
Jekyll natively supports the Markdown markup language but I wanted the blog to also support AsciiDoc, as I strongly prefer it for writing technical posts. As a result, the blog is set up to handle both markup languages. If you’re unsure which format is best for you, this article from AsciiDoctor Docs can help you make that decision.
Introducing Minimal Mistakes
The blog depends on the Minimal Mistakes remote theme:
remote_theme: mmistakes/minimal-mistakes@4.26.2That theme was created by Michael Rose. It’s 100% free, highly customizable, fully responsive and extensively documented.
The Minimal Mistakes source code is available in the mmistakes/minimal-mistakes repository.
Customizing the theme
Before diving into theme customization for your blog, have you explored all the skins offered by Minimal Mistakes?
If you haven’t made any changes yet, your blog is currently using the default skin:
minimal_mistakes_skin: default (1)| 1 | Additional skins are available: air, aqua, contrast, dark, neon, mint, plum and sunrise. |
Once you’ve chosen a skin, you may want to further customize your blog’s style by adding or overriding CSS rules. While the Minimal Mistakes documentation covers this thoroughly, I opted for a different approach. It may not be as polished as the recommended method, but requires significantly less effort when only minimal changes are needed.
Minimal Mistakes provides an empty _includes/head/custom.html file that you can use to customize the HTML content within your blog’s head tag.
That’s how I introduced my own CSS rules:
<link rel="stylesheet" href="/assets/css/rouge/base16.monokai.dark.css">
<link rel="stylesheet" href="/assets/css/custom.css"> (1)| 1 | This file contains all custom CSS rules applied on top of the Minimal Mistakes skin. |
You might also consider customizing the layouts offered by Minimal Mistakes. However, that requires more effort than I aimed for with this blog, so what you’re reading now uses the default layouts with no custom changes.
Enabling comments in your posts
Comments are not enabled in your blog posts yet.
To enable them, you’ll need to update the _config.yml file in your repo:
defaults:
  - scope:
      path: ""
      type: posts
    values:
comments: false (1)| 1 | Set this value to true to enable comments in all posts. |
You will also need to select and configure a comment provider supported by the Minimal Mistakes theme. I chose Giscus which relies on GitHub Discussions to manage comments. It’s open source, free and highly customizable. If you plan on using that provider, I recommend reviewing this documentation from Minimal Mistakes first.
|
The giscus.app site suggests adding a |
Here’s how your _config.yml file should look like after adding the config values provided by giscus.app:
comments:
  giscus:
    category_name: Blog posts (1)
    category_id: DIC_kwDOL32gyc4ChLma (2)
    discussion_term: "og:title" (3)
    reactions_enabled: "1" (4)
    repo_id: R_kgDOL32gyQ (5)
    theme: light (6)
provider: giscus| 1 | You don’t have to use one of the default discussion categories provided by GitHub. This one is a custom category. |
| 2 | Replace this with the value provided by giscus.app. |
| 3 | This determines the title of each discussion in GitHub Discussions. |
| 4 | This allows users to react with emojis in addition to posting comments. |
| 5 | Replace this with the value provided by giscus.app. |
| 6 | A preview of each theme is available in giscus.app. |
That’s all you need to do to enable comments in your posts.
Improving the readability of your posts
Making important information stand out with admonitions
Admonitions from AsciiDoc are an excellent way to make important information stand out in your posts:
|
This is a |
Here is the AsciiDoc syntax behind it:
[TIP] (1)
====
This is a `TIP` admonition.
====| 1 | Additional admonition types are supported: NOTE, WARNING, IMPORTANT and CAUTION. |
|
Did you notice the |
All admonitions in your blog rely on icons from Font Awesome.
You can customize both the icon and its color for each admonition type in the assets/css/custom.css file:
.admonitionblock .icon-tip::before {
    color: #f6cc40;
    content: "\f0eb"; (1)
}| 1 | This determines which icon from Font Awesome is used. |
Commenting code blocks with callouts
Callouts from AsciiDoc can be used to provide additional information about a specific line of code:
import java.util.Random; (1)

public class NotSoRandom {
    public void run() {
        Random random = new Random(-6732303926L);
        for (int i = 0; i < 10; i++)
            System.out.println(random.nextInt(10)); (2)
        }
    }
}| 1 | Don’t do this at home! You should always use java.security.SecureRandom when you need a truly random number in Java. |
| 2 | Can you guess what will be printed? |
Here is the AsciiDoc syntax behind that code block:
[source, java]
----
import java.util.Random; // <1>

public class NotSoRandom {
    public void run() {
        Random random = new Random(-6732303926L);
        for (int i = 0; i < 10; i++)
            System.out.println(random.nextInt(10)); // <2>
        }
    }
}
----
<1> Don't do this at home!
You should always use https://docs.oracle.com/en/java/javase/21/docs/api/java.base/java/security/SecureRandom.html[java.security.SecureRandom^] when you need a truly random number in Java.
<2> Can you guess what will be printed?
Changing the syntax highlighting theme in code blocks
Code blocks from your blog are highlighted with Rouge, a build-time syntax highlighter written in Ruby which supports over 200 languages.
The blog depends on one of the many themes available in Rouge:
<link rel="stylesheet" href="/assets/css/rouge/base16.monokai.dark.css"> (1)
<link rel="stylesheet" href="/assets/css/custom.css">| 1 | This is how the base16.monokai.dark theme from Rouge is applied to the blog. |
To change the theme, you will need to use a different CSS file from Rouge. While the CSS files can be downloaded from third-party sources, there is a way to generate them directly from the command line:
gem install rouge (1)
rougify help style (2)
rougify style thankful_eyes > thankful_eyes.css (3)| 1 | This installs the rouge gem on your machine. |
| 2 | This lists all themes available in Rouge. |
| 3 | This generates the CSS file for the thankful_eyes theme and saves the output as thankful_eyes.css. |
Updating dependencies automatically with Dependabot
Keeping dependencies up to date is important for addressing security vulnerabilities, fixing bugs, and taking advantage of enhancements or new features. Although this process can be time-consuming, your repository already benefits from some automation through GitHub’s Dependabot. When a new version of a blog dependency becomes available, Dependabot will automatically create a pull request similar to gwenneg.github.io#22. All you will need to do is test the PR and then merge it.
Here’s how Dependabot is configured in your repo:
version: 2
updates:
  - package-ecosystem: "bundler" (1)
    directory: "/"
    schedule:
      interval: "weekly" (2)
  - package-ecosystem: "github-actions" (3)
    directory: "/"
    schedule:
interval: "weekly"| 1 | This will automatically update the Ruby gems the blog depends on. |
| 2 | Dependabot will check for newer versions on Monday each week. Additional intervals are available. |
| 3 | This will automatically update the GitHub Actions from the blog repo. |
Conclusion
Setting up a blog on GitHub Pages doesn’t have to be a daunting task. With the right tools, templates, and a bit of guidance, you can have your blog up and running with minimal effort. By leveraging the built-in features of Jekyll and the Minimal Mistakes theme, you can focus on what truly matters - creating content - without getting lost in the technical details.
Whether you’re new to blogging or just looking for a simpler way to manage your site, I hope this guide has shown you that it’s easier than you think to get started.
Now, all that’s left is to share your thoughts with the world. Happy blogging!
Leave a comment